Tips & Tricks page
Click to return to home page
Along the way we have picked up some tips and tricks...
Thanks go to my friends and other folk met along the way and online..some of these tips have come from you...we forget who you are but thanks.
Click on the menu items to the left to see what's here.
Of course if you would like additional information on anything on this, or any page please don't hesitate to email us....your email address will always remain confidential. Our email link is above left.
On a couple of occasions we had noticed water leaking from under the front of the shower, it appeared to be coming from between the front wall of the shower, just below the door, and the floor.
Having a leak here is never a good thing, the wood paneling would soon suffer.
It was a bit of a mystery as to just where this water was coming from, the seal around the door appeared to be ok, the shower base is a one piece fibre glass 'basin' and there was nowhere water could leak....the drain plug became suspect.
Now, Jayco in their wisdom, had heaped a black bitumen/rubber type sealing compound all around the area where the drain plug protrudes through the floor on the underside of the caravan....it took a lot of sweat and the occasional swear word before I had this goop cleared away so i could remove the drain plug and fitting. I used an old lino knife and narrow nosed pliers, cutting into the sealer and pulling small pieces out with the pliers....a lot of care with the knife was needed lest I damaged the fibre glass shower base.
Once I was able to remove the fitting the reason for the leak became obvious, the plastic flange that is supposed to sit in a recess in the shower base and seal the drain was poorly made, two tiny lugs, formed when the plastic was moulded, had not been cleaned off and were preventing a seal, there was one of these 'lugs' on each side of the fitting. I cleaned them off with a Stanley knife and very fine sandpaper, applied a very thin film of silicone sealer and refitted the drain....a test confirmed the leak was fixed.
Clickable slide show below.
Leaking shower base in caravan


")
Email us
How do we plan our trips?
It is our opinion that the planning stage is as good as the trip itself!...it is fun to plan, to look for exactly where to go, where not to go and where to stop. Of course some planning is necessary from a money point of view however I must also say that our trip plans almost always change along the way, sometimes within the first few days!...chatting with others around a happy hour campfire will often result in route changes, mention of a 'great place to camp' is often enough to chuck the original plans out the window.
We use modern technology as much as we can, we travel with a smart phone and a lap top computer, we have a Telstra wireless broadband account and find that we can get coverage in most towns nowadays.
To find where we are to camp we use two apps mainly; Caravancaravan and Wikicamps. I must admit that I am not a fan of printed books such as Camps, they are very expensive and often are quite short on information but my main gripe is that as these books are reprinted at yearly (or longer) intervals you may find that the information is out of date. By contrast Wikicamps and to a lessor extent, Caravancaravan.com is updated by users, much of the information might be only days, or even hours old.
One caution however, apply some 'grain of salt' thinking when reading Wikicamps comments, one mans dislike might not be of a concern to you.
Of course we use Google Maps but we also carry and use printed maps. I cannot over-stress the need to have late edition printed maps,...there will be many places in rural Australia yet to join the digital age!
You cannot rely on your GPS either....sadly however decent printed maps are becoming scarce....my favourite large edition of the UBD Australian Road Atlas appears not to have been reprinted since 2017.
Our new tow vehicle does have a GPS system, basically we connect a smart mobile phone to the infomedia screen and view Google Mapping via Android Auto, while it is quite useful we feel it is more designed for city use, once away from built up areas it does struggle sometimes .
Trip Planning
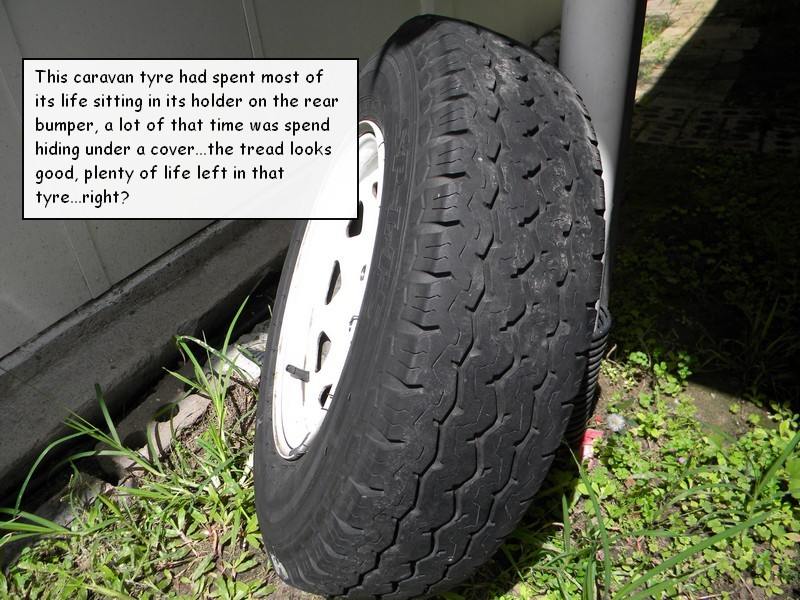
Motor vehicle tyres are expensive and we all strive to make them last as long as possible, we religiously check the pressures, we have them rotated regulary and most importantly we get a wheel alignment at least yearly...right??.
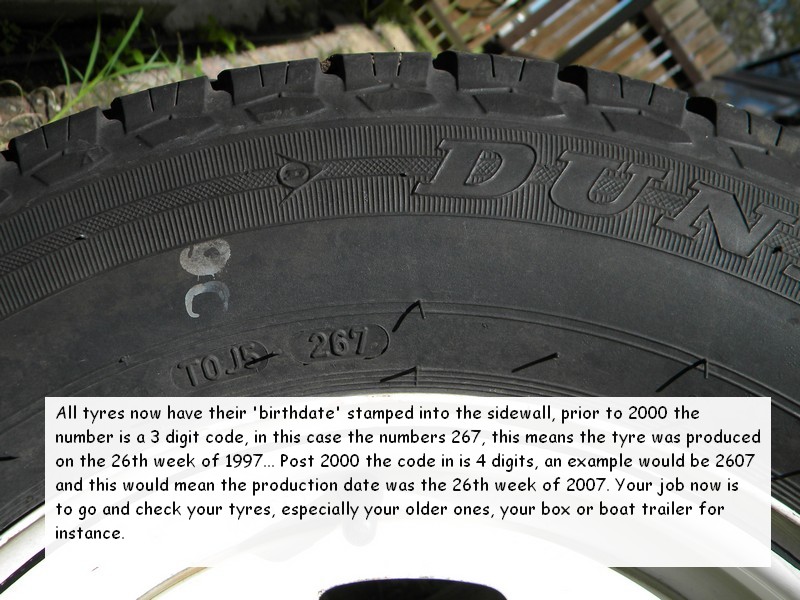
One thing we may not always think about is the age of our tyres, did you know that tyres actually have a 'shelf life'?, in fact six years is about the life of a tyre. Check the photos below to see my issue.
One thing we may not always think about is the age of our tyres, did you know that tyres actually have a 'shelf life'?, in fact six years is about the life of a tyre. Check the photos below to see my issue.

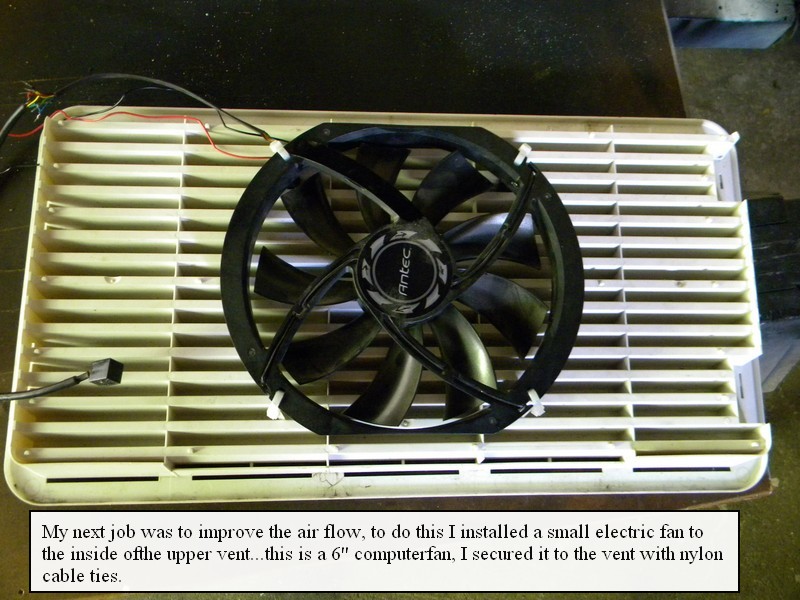
Caravan refrigerators are most commonly the absorption type, the type that run on 240v, 12v and LPG, they are popular primarily because they can be used when camping away from a power point (on gas) rather than needing electricity and they can be operated from the tow vehicle battery while travelling. Compressor fridge's are becoming popular, improvements in compressor technology and batteries will some day see them replace the absorption fridge. In the meantime there are a few things you can do to ensure your absorption fridge is working at peak efficiency.
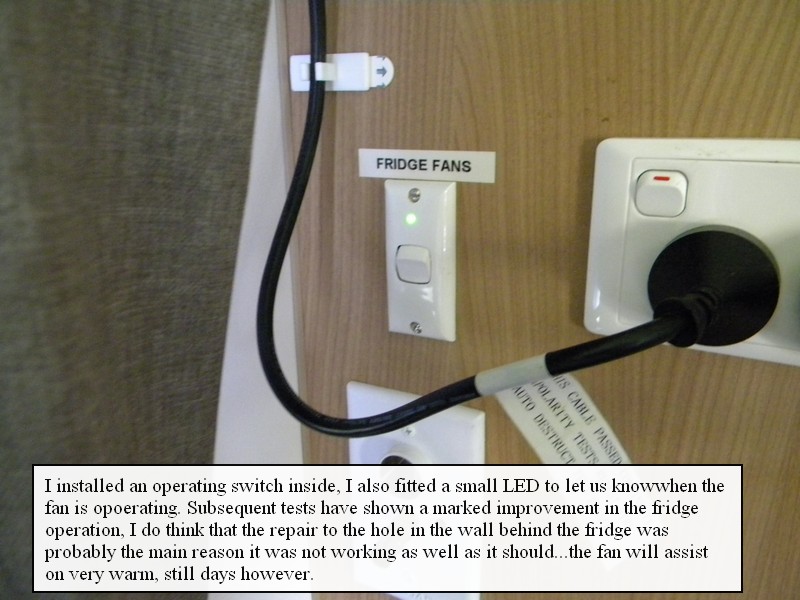
Note too that although you can run an absorption fridge directly off a 12 volt battery beware that they will consume some 10 amps or higher, your battery will flatten quickly.
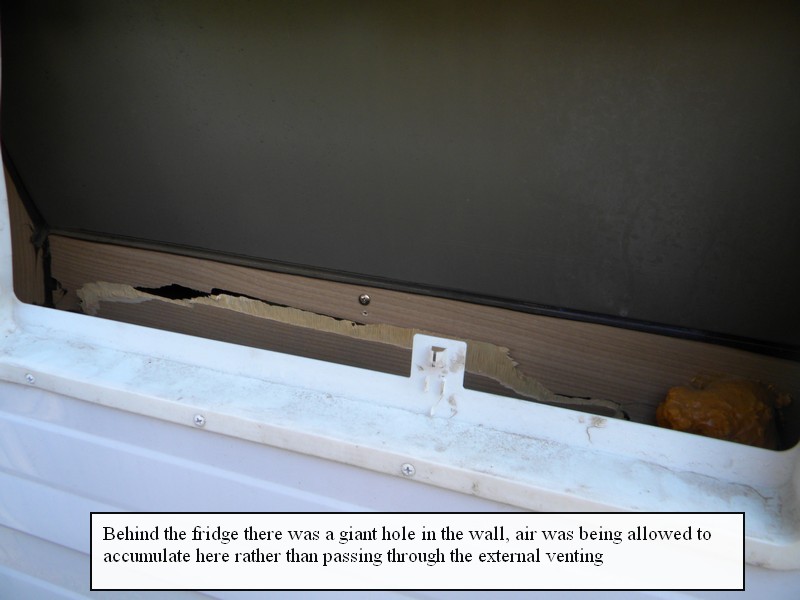
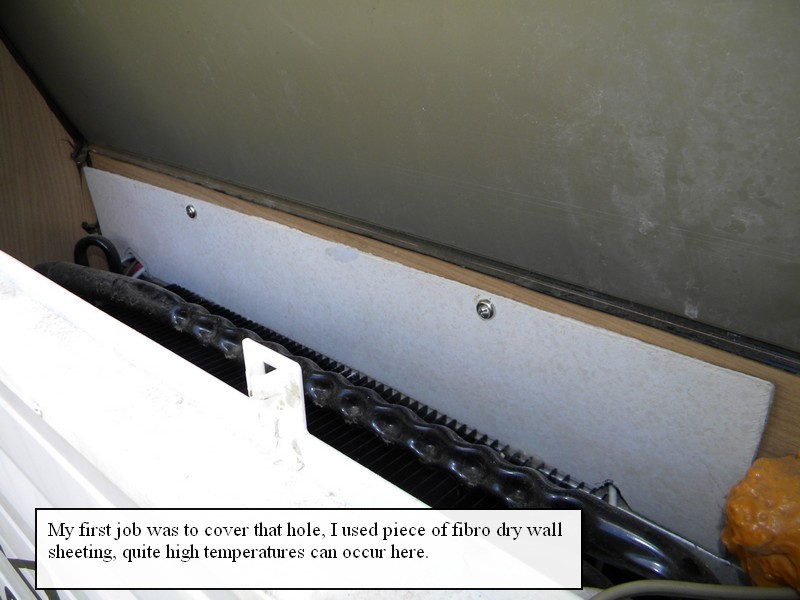
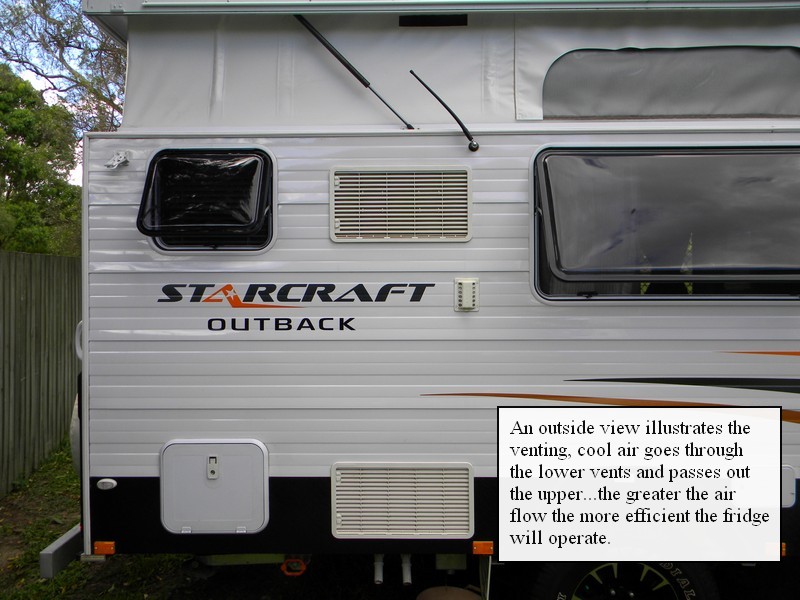
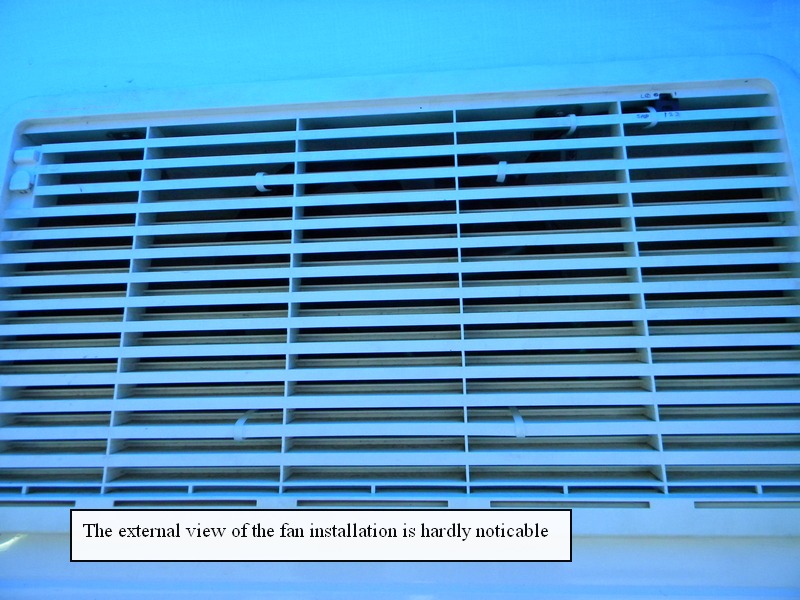
The main thing that can affect this type of fridge is ventilation, or lack of it...an absorption fridge will work best if the hot air that it generates is removed as quickly as possible...unfortunately few caravan manufactures design the fridge cabinet backing with this in mind, while the installation will probably suit most owners needs, especially those in Australia's south its not until we venture into the tropics that the deficiencies become apparent...our 2013 Jayco was such an example.
It is worth noting here that as well as the caravan fridge we have a Waeco portable freezer. This unit operates in a similar fashion to a home refrigerator with a compressor. Despite it remaining constantly on the back seat of the car where the temperature at one point was 42 celcius it had no difficulty in maintaining -14 to -17 degrees. The down-side to this type of unit is that it only runs on electricity (12-24vdc or 240vac), with one of these fridge's you must have access to electricity constantly.
Note too that although you can run an absorption fridge directly off a 12 volt battery beware that they will consume some 10 amps or higher, your battery will flatten quickly.
The main thing that can affect this type of fridge is ventilation, or lack of it...an absorption fridge will work best if the hot air that it generates is removed as quickly as possible...unfortunately few caravan manufactures design the fridge cabinet backing with this in mind, while the installation will probably suit most owners needs, especially those in Australia's south its not until we venture into the tropics that the deficiencies become apparent...our 2013 Jayco was such an example.
It is worth noting here that as well as the caravan fridge we have a Waeco portable freezer. This unit operates in a similar fashion to a home refrigerator with a compressor. Despite it remaining constantly on the back seat of the car where the temperature at one point was 42 celcius it had no difficulty in maintaining -14 to -17 degrees. The down-side to this type of unit is that it only runs on electricity (12-24vdc or 240vac), with one of these fridge's you must have access to electricity constantly.
Caravan refrigerator performance improvement.

Tyres have a 'use by' date
HWS anode replacment
HWS activation
Electrical hot water systems incorporate a device designed to reduce corrosion on the internal metal components. A bar made of magnesium is installed in the base of the system, its correct name is a Sacrificial Anode...you will also find a sacrificial anode of the skeg of an out board boat motor. The idea is that the anode bar, which is easily replaced, will corrode thereby reducing corrosion within the water tank, or the outboard outboard motor. Anode bars should be inspected regularly, especially if water with a high concentration of minerals, ie, outback bore water has been used...six monthly inspections are recommended....scroll down to see how to do this simple job.
In this case the HWS is a US made Suburban brand, a very popular system used in the majority of Australian caravans and RV's...yours may be different but regardless it will still have a sacrificial anode installed somewhere...you may have to check your user manual or contact the manufacturer if you are unsure.
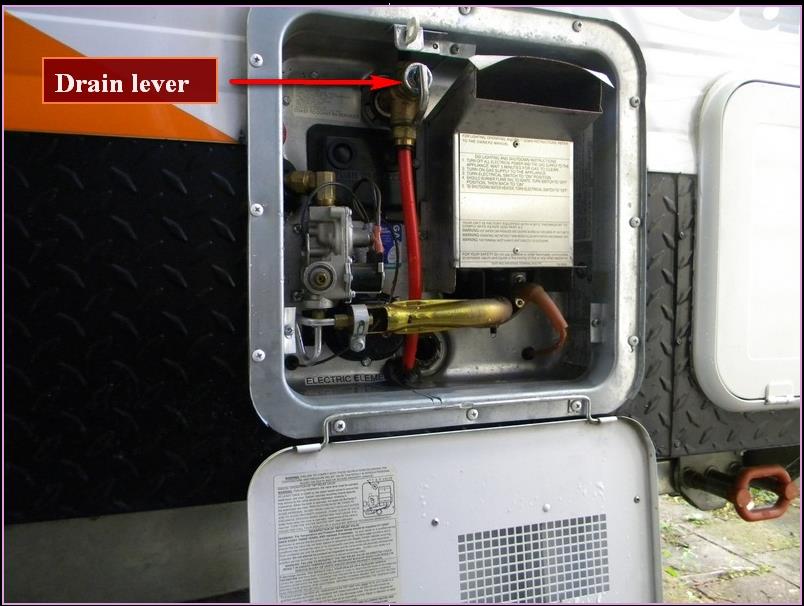
Before proceeding you will need to relieve the system water pressure, do this by pulling the drain lever towards you, obviously any water pumps need to be deactivated and there should be no hose connection to the RV...ensure also that you have shut down the 240v power connection. (you will be spraying water around this area during this operation)
Before proceeding you will need to relieve the system water pressure, do this by pulling the drain lever towards you, obviously any water pumps need to be deactivated and there should be no hose connection to the RV...ensure also that you have shut down the 240v power connection. (you will be spraying water around this area during this operation)
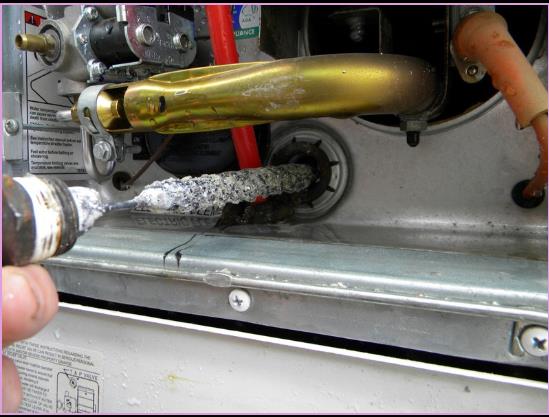
The bar is installed behind a large hex head at the base, you will need a 27mm socket to remove it....water and gunk will come out of the hole when the bar is removed...allow it to drain completely...insert a hose and flush, do this several times until the water comes out clean.
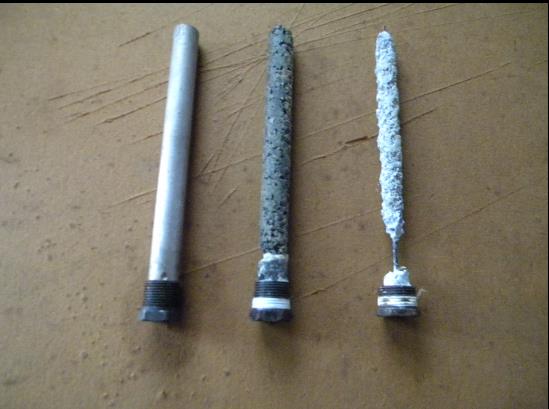
The bar on the left is new, the middle one 10 months old and the right hand one about also about 10 months, the degree of wear will depend on the water quality, in this case a mixture of bore and town water had been used. When you re-install the bar ensure you apply thread tape, start it turning by hand, you really do not want to cross the thread here.
This bar is only around 50% worn yet due to the relatively cheap cost of these things I would consider replace this one had I gone to the trouble of inspecting it. I brought mine online, genuine Suburban units will cost around $15 each plus p&p.
This bar is only around 50% worn yet due to the relatively cheap cost of these things I would consider replace this one had I gone to the trouble of inspecting it. I brought mine online, genuine Suburban units will cost around $15 each plus p&p.
Caravan water tank cleaning
When we return home from a trip I like to drain and flush our water tanks, especially if have have been out bush where the water is not always sparkling clean.
I would like to say however that we usually do not have an issue with using rural bore water, most folks west of the Great Dividing Range have little choice, they use either tank water or, in times of little rain they use bore water, we feel that if these people can use the water, so can we.
We do use a particle filter to protect the water pump and I am always amazed at how grit and stuff can get into the water tanks given the fine screen filter it goes through!.
However, as I said earlier we do like to drain and flush the tanks and the entire water system once we get back home.
The water tank drain plugs on our van are just 13 mm in diameter, this means that when the plugs are removed the water does not rush out but drains rather slowly over quite a period of time...this got me to thinking: if the water is coming out slowly it will likely not be carrying out much debris with it, ie, sand and grit and any other contaminants, ideally the tanks should be shaken before draining but this is of course would mean removing them from the van, a big job.
There is some argument about wether water tanks should be left full, partly full or empty, my thoughts here would depend on just how long between trips, for more than two months I would drain them and leave them empty, I would then flush them with fresh water before the next trip however.
So, I have come up with a system to clean the tanks insides, using material I had sitting in my garden shed I developed a sprayer....scroll down to see what I have done
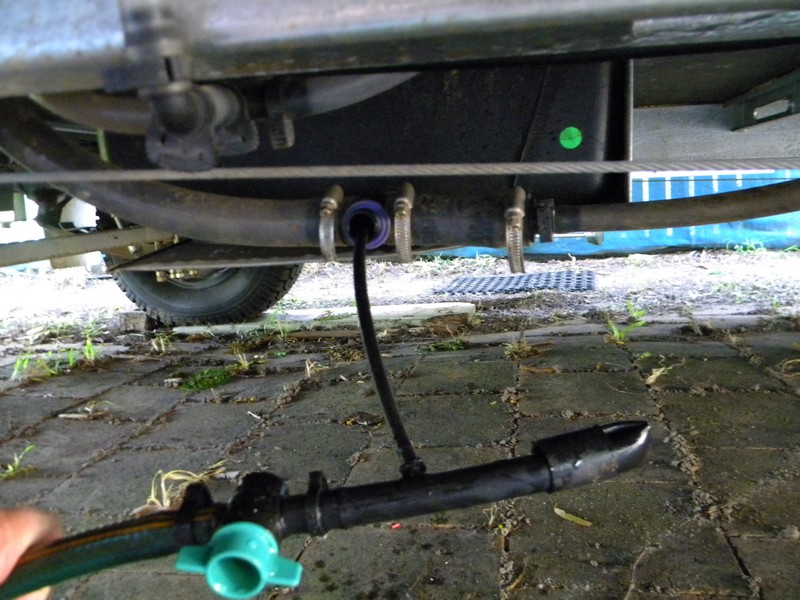
The components for the flusher can be obtained from any hardware store. Note that the fittings are of the type used for home irrigation systems, they are barbed but must have clips installed to prevent them popping off. The tap connection is followed by 2 short lengths of 13 mm pipe with a tap installed centrally, at the end I have installed an end flow fitting which allowed me to insert the 5 mm piping.
The small dimension pipe must be of sufficient length to reach right across inside your water tanks, in my case my 80 L tanks are 1200 mm from one end to the other, I therefore used a piece 1500 mm long.
The small dimension pipe must be of sufficient length to reach right across inside your water tanks, in my case my 80 L tanks are 1200 mm from one end to the other, I therefore used a piece 1500 mm long.
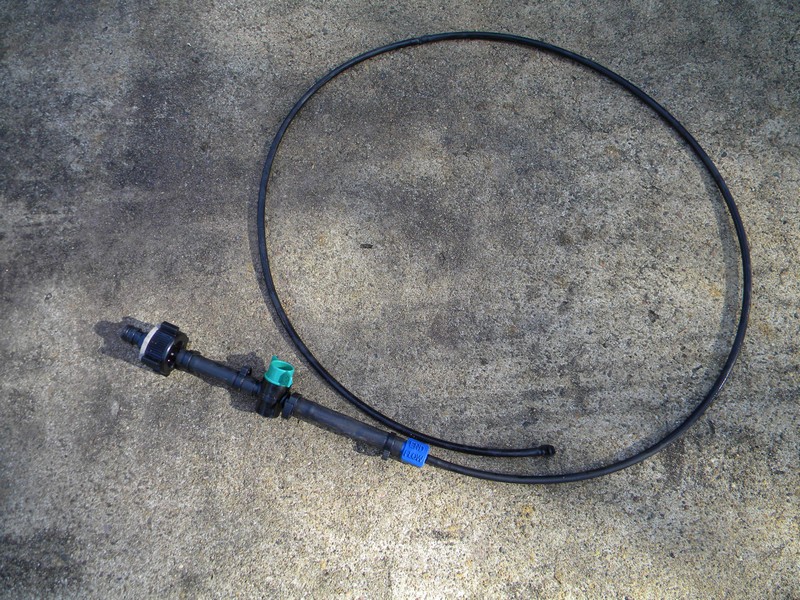
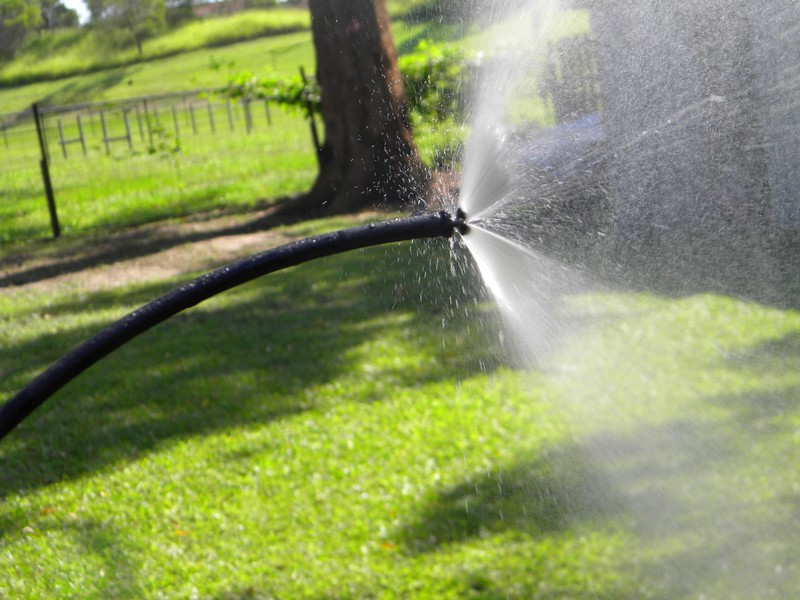
At the end of the 5 mm pipe I have installed a full circle sprinkler...these can also be obtained from a hardware store for very little cost..., the type I used has a push on barbed fitting, I feel this type has a superior grip and will not blow off under pressure. With the tap turned on fully a good spray is directed from the sprinkler.
Fortunately our van has removable drain plugs, once removed the opening is 13mm and this is where the sprayer nozzle is inserted. If your van does not have a drain plug don't despair..scroll down
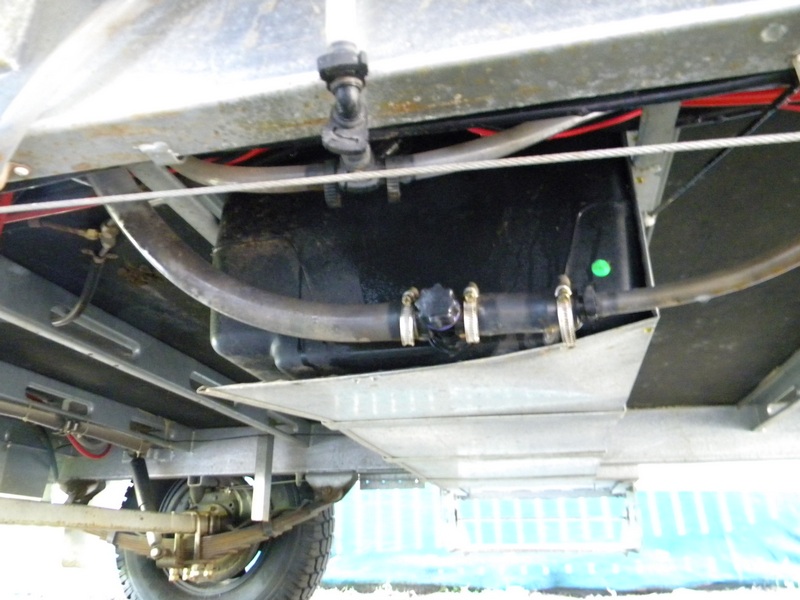
If your caravan does not have a removable drain plug you will still be able to use the flusher by removing the filler hose, the larger one in the centre in this photo, you will also need to remove the pipe from the out hose. (in this picture there are two out outlets, you may have only one.
Ensure to apply thread sealing tape to any threaded connections when refitting.
Ensure to apply thread sealing tape to any threaded connections when refitting.
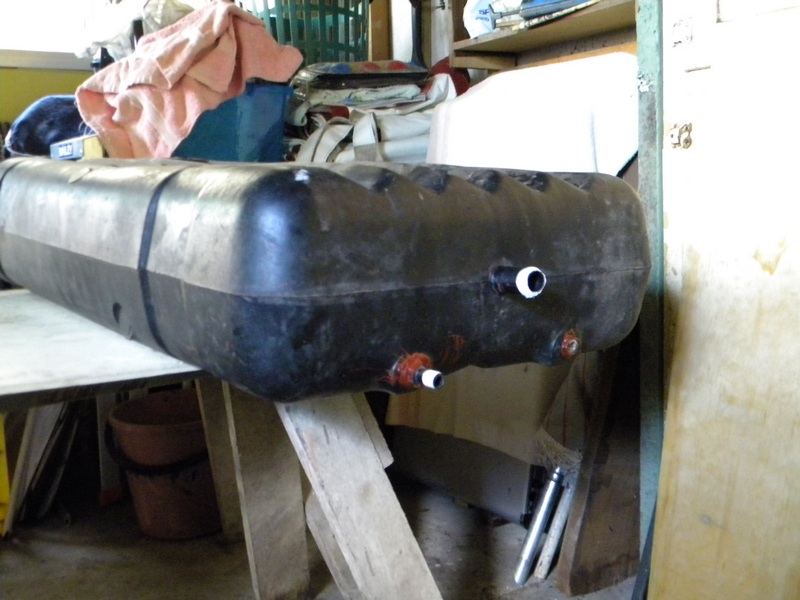
The flusher is fitted to the garden hose and inserted into each tank via the drain plug hole. (or filler hole if need be). Note that these tanks have built-in baffles, these are just moulding's in the base designed to reduce water sloshing around when driving, by 'wriggling' your flusher hose you will be able to get it to reach all the way to the far side. At that point, with the water pressure up and with a wrist twisting motion slowly draw the flusher back and forward from one side of the tank to the other several times.
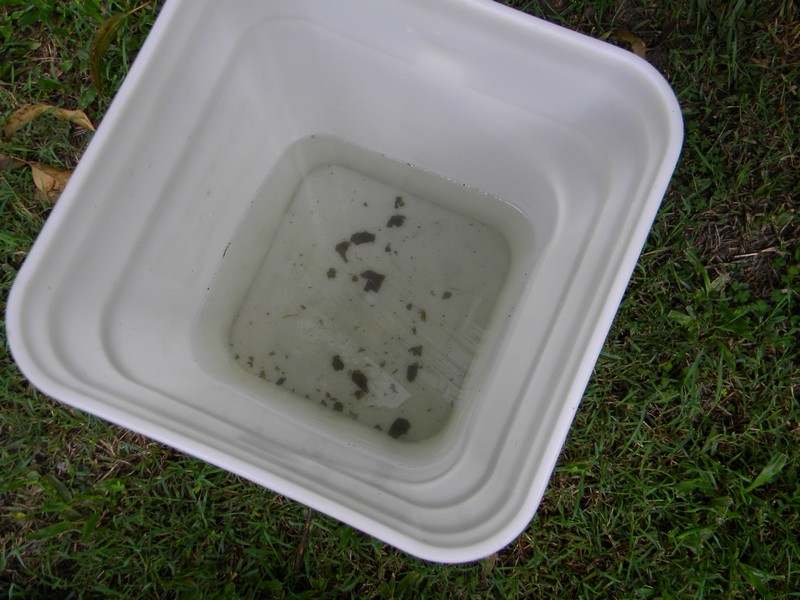
You might be surprised at the gunk you will flush out, especially if it is some time between flushes.
If you get a lot of gunk I suggest you a pay particular attention to flushing your pipes. I might be advisable to purchase a tank cleaning solution available from most hardware and caravan accessory stores. Follow the directions on the container.
After you have flushed your tanks go inside your van and place a bucket under the tap over your galley sink, either pump water through via the electric pump of connect your 'van to mains, actually it is a good idea to do both, this way you will be flushing clean water through all pipes.
If you wish you can do any other taps you may have, the ensuite and shower, any external taps maybe.
Warning...ensure mains power and mains water is disconnected from the RV before carrying out this maintenance work.
Return to page top
Return to page top
Return to page top
Return to page top
Return to page top
Return to page top
On a recent trip we were surprised to find that one of our 9kg gas bottles became empty long before it should have, fearing a gas leak I checked all connections and lines closely, (using soapy water in a spray bottle, not a cigarette lighter!) found nothing and simply decided we had used the gas up. It wasn’t until a week later that I realized what happened.
We were in an isolated campground out on the Warrego Highway in western Queensland when, during the wee hours, I was awoken by the sound of what I thought was our neighbours gas hot water system heating up.
When heating these systems sound a little like a hot air balloon passing overhead...I thought little more of it until the morning when I realized that we actually didn’t have any nearby neighbours!, and on discussing it we now recalled hearing this before a few times on this trip, we had been hearing our own gas being used up!
And I knew why...right away I knew had happened!!....after a bit of thought I knew what I had to do to fix it, anyone with a little low voltage wiring experience can do it too...click below for an explanation.
Warning...ensure you disconnect your mains voltage connection before proceeding
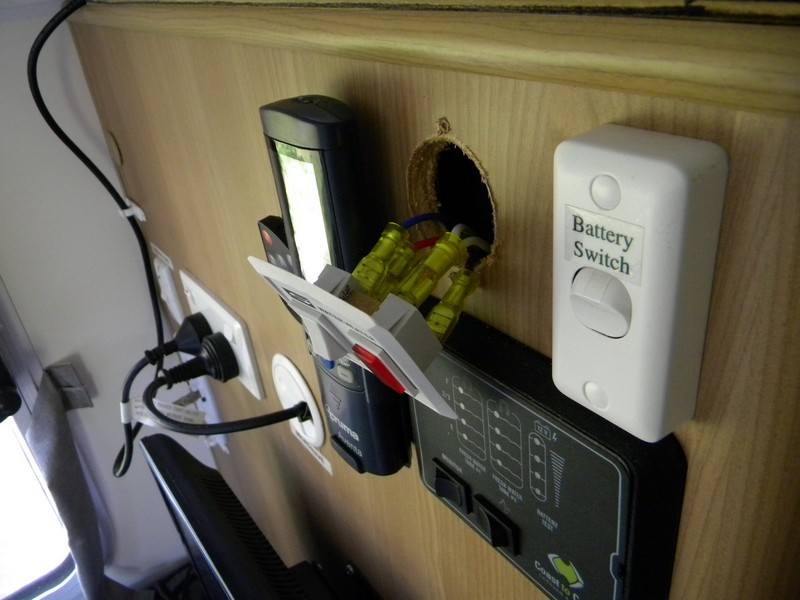
This is the Hot Water System (HWS) control panel as installed in our Jayco Outback caravan. There are probably different panels around but this one is quite common across the Jayco (and others) range. In this photo the system is activated, the switch is in the 'on' position and the indicator light glows, when the gas ignites (about 5 secs) this indicator lights goes out, however the switch is still on of course and the system is still active, if left in this position the gas will re-ignite automatically as soon as water cools.
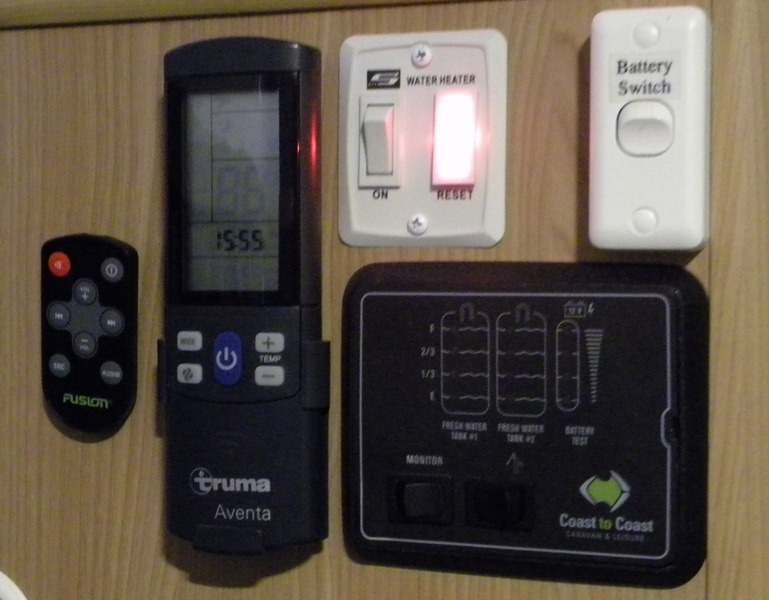
Now it dawned on us just why our gas was all used up, we had forgotten to turn the system off, there being no indicator to warn us it was still on, the system is not particularly noisy on start up, we may not have heard it.. Obviously I needed to do something. The panel is easily removed, just two screws.
I popped into Jaycar and brought a small LED indicator light. It cost all of $3.45!! I used green but they are available in blue, amber and red.
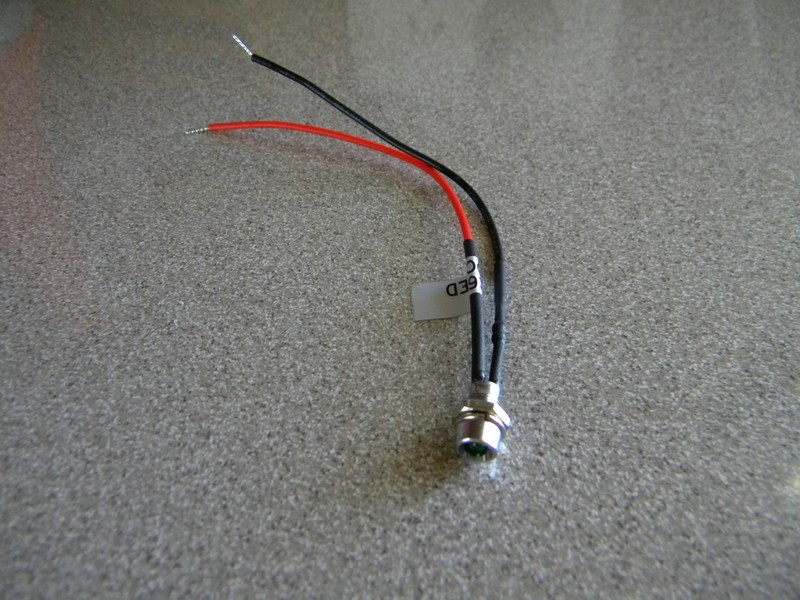
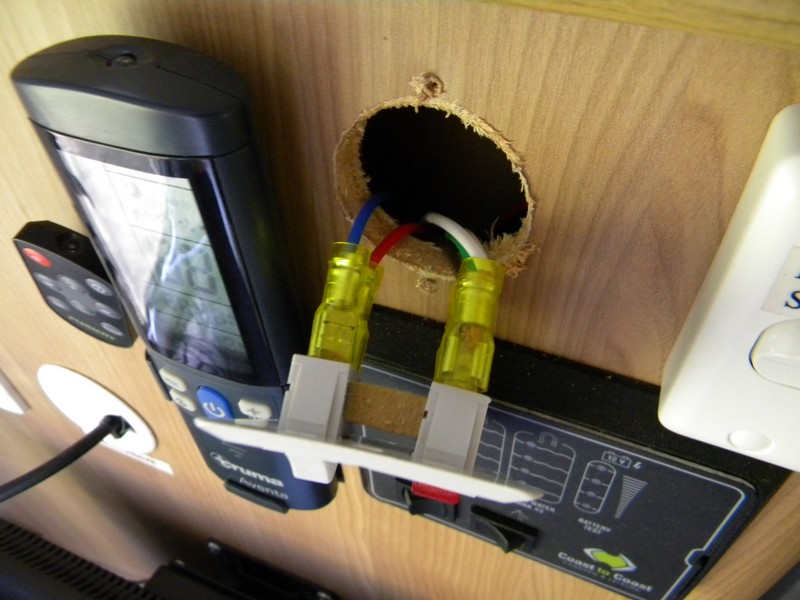
At the rear of the panel there are four connectors...on the left hand side there is a blue wire (12v pos) at the bottom, on the right hand side there is a terminal with two white wires (ground) at the top. It is between these two terminals that you will connect your LED, the LED has two wires, red (12 vdc pos) and black (ground).
I cheated a little here, I found I was able to insert the tiny LED wires into the existing push-on connectors behind the switch panel, you may prefer a more 'professional' approach but I doubt that they will be able to drop out, they are a very tight fit.
I cheated a little here, I found I was able to insert the tiny LED wires into the existing push-on connectors behind the switch panel, you may prefer a more 'professional' approach but I doubt that they will be able to drop out, they are a very tight fit.
Using a 5 mm drill I put a hole in the plastic panel. One thing to be careful of here, when you disconnect the wires from behind the switch as you will do in order to easily and accurately drill the hole, be very careful that they don't drop back through the hole on the wall, I think they would be a 'bitch' to retrieve.

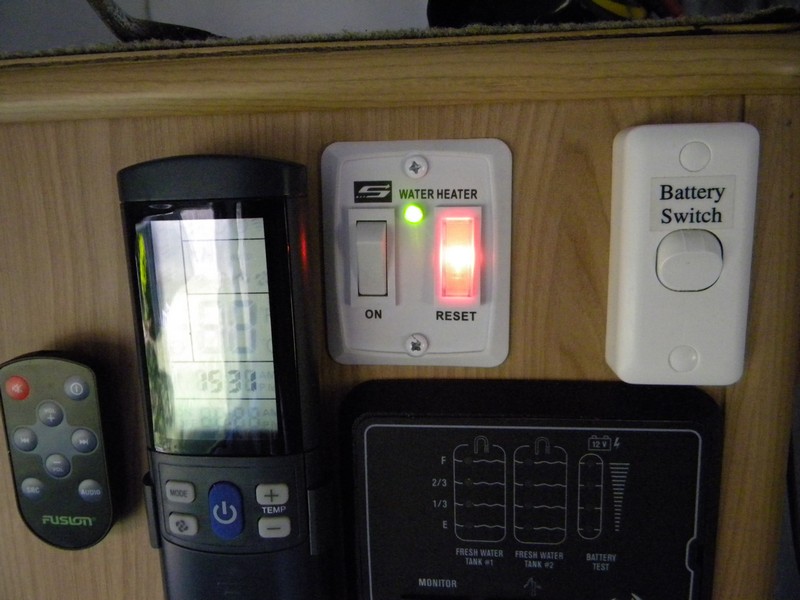
In this photo the system has been activated and it is sending a spark to the HWS awaiting gas ignition, this takes around 5 seconds or so, once fired up the amber main light will go out.....
...but now the newly installed LED remains lit after the main indicator goes out, the green LED will stay lit while the switch is in the on position, once the gas has heated the switch is moved to the off position and all lights go out.. the LED is quite bright and gives excellent warning . ..I really have no idea why the HWS manufacturers didn't do this in the first place.

Paul and Pam's Website - Queensland Australia
Return to page top